
The Best way to Protect your Account
More and more frequently people are receiving emails from a friend about “how I have to check out this new product they just used…” We have all seen these emails, sent by some anonymous person who happened to get our friend’s email password and started sending out spam mail to everyone on their contact list. It is annoying at best, sometimes these messages are how computer virus’ can spread. It is important to keep our passwords secure and up-to-date. But there are other ways to stop someone from gaining access to your email and other information. In the case of Apple’s iCloud, you can setup two-step authorization. 
Two-step authorization works by putting another level of security on top of your password. It functions on the basis of having two things to get into an account, something you know (your password) and something you have (an apple device). The you use it, you go to use iCloud online and when you sign in with your password, you are asked by iCloud for another randomly generated code that is either sent via text or a Find My iPhone notification to one of your registered apple devices, once that code is entered, you have access to iCloud. So someone having your password is not enough to be able to access your iCloud data.
The way that you setup two-step authorization is to start at appleid.apple.com and click “Manage your Apple ID” and then login to your iCloud account. From there you click on “Password and Security” and click “Turn on Two-Step Authorization”. 
Follow and read the instructions that are displayed to turn on the service. You will be asked to enter in your cell phone number as the first device that is a “trusted device”. You will be sent a 4 digit code that is used to verify that you have the phone in your possession. From here, you can add more phone numbers to be trusted devices or have any iOS device that is signed into Find my iPhone become a trusted device.
If you want to have an iOS device be registered as a trusted device, you need to click verify on the screen and a notification with a 4 digit code will be sent to your device. Enter that code and your iOS device is registered. Once you have all of the devices you want trusted, click the next step.

Here you are shown your recovery key. This is the key that is used in the case that you do not have access to a trusted device. Apple recommends printing the key and saving it somewhere in your house (or some place safe). Once you have that saved, click next again. Here apple will verify you have a copy of the key by having you enter the key again into the computer. The final step is to agree to the conditions for two-step authorization.
At this point, we have turned on two-step authorization and our iCloud information is secured. But there is one more thing I want to go over concerning this new security system, and that is app specific passwords.
So far two-step authorization has protected us from letting someone who knows our password have direct access to our data, but it has not addressed the issue of programs that are always connected to our iCloud account, for example the mail app on your iDevice. If you have noticed, you do not have to put your iCloud password in every time you access mail on your device, it just remembers your password the one time you entered it. To address this issue with two-step authorization, apple created app-specific passwords for these accounts that are randomly generated for each app that access iCloud this way (think mail on your computer, iPhone, iPad, or access your contacts on any of these devices). So you end up creating a unique, randomly generated password for your always connected apps.
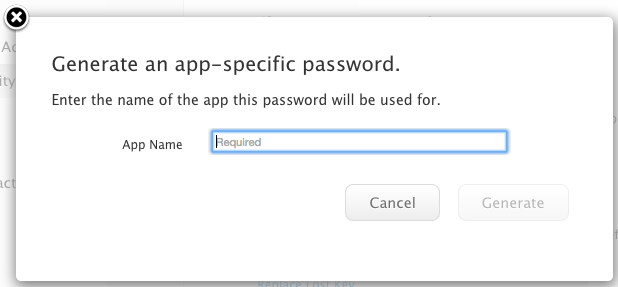
To create an app-specific password, we have to navigate to appleid.apple.com on any web browser:
> Log in to your apple ID > click Password and Security on the left had side > click Generate App-Specific Password > Type in the name of the app using the password > Click generate
You will now be shown the unique password for the app that wants constant access to iCloud. Enter the password you see into the password field for your app and continue signing in. You will not be shown this password again, so make sure you are logged in before closing the app-specific password window. So you will have to generate a new app-specific password for every program or app that wants constant access to iCloud.

Now that we have setup our app-specific passwords, you need to learn how to manage them. From the password and security section of appleid.apple.com there is an option to view history under app-specific password. Here is the place where you can revoke a password if you are no longer using an app or device (remove access for mail, calendar, or some app that is accessing this data).
Finally in the password and security section, you can replace you recovery key (they key to get into iCloud if you do not have a trusted device). Also, you can manage your trusted devices. These are the devices which which can have a code sent to them to get into your iCloud account, step two of the two-step authorization. With this system in place, if someone got ahold of your password, they would still not be able to access any of your data in iCloud.


Comments